


Learn how to make a mesh wreath using these simple to follow steps. This wreath was made by using two colors of deco mesh as well as three different colors of wire-edged ribbon.
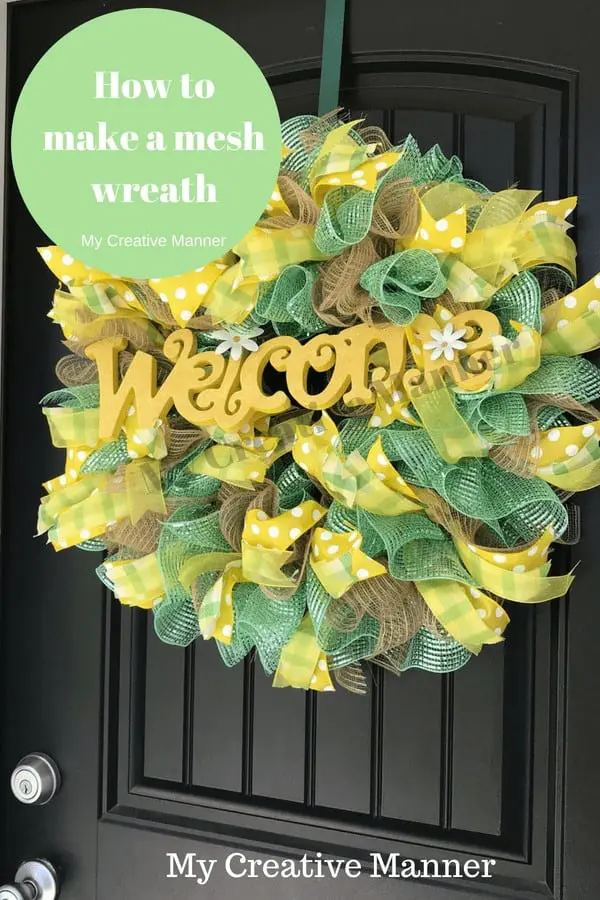
Create your own beautiful wreath to display on your front door and welcome your guest.

One of my favorite things to do is make crafts and I love making wreaths. I have fallen in love with these deco mesh ribbon wreaths. It's fun to design a wreath for each season for my front door.
The steps used for this wreath and be easily used to create one for any season. By simply changing the color of mesh used, you can easily add a third color of mesh.
Being that I have been having fun making these types of wreaths I thought it would be fun to share with you step-by-step directions on how to make one.
I bought a roll of 10 in. by 30 feet of premium mesh ribbon in green color, and another roll of 10 in. by 30 feet of basic mesh ribbon with jute in a brown color.
Hobby Lobby has a great selection of colors to choose from. As well as most craft stores.

Rolling the two colors out together I cut them at 14 inches. I don't have a cutting mat, but I have placed tape on my desk at different inches that I have used for cutting in the past.
I wanted this wreath nice and full so I cut out 21, 14-inch sections of both colors. The mesh likes to roll when being cut so I placed a roll of ribbon on the end to hold it down.
Pipe Cleaners
Using a 16-inch wire wreath frame I secured pipe cleaners that I had cut in half on. Coming up from the back of the wreath and twisting the pipe cleaner onto the front of the frame.
I placed the first pipe cleaner on the bottom two wires. Then I placed a pipe cleaner on the middle two and moved to the top two. I repeated this pattern all the way around the frame.

This will help make the wreath look fuller so there aren't any gaps. I feel the more mesh the better the wreath looks.
Since this is a 16-inch frame there are 8 sections, In six of my sections I had 5 pipe cleaners on, two I had 6 pipe cleaners on.
Originally I placed 5 pipe cleaners in each section, but when I came to the end of adding my mesh. I found that I had a space that I wanted to be filled so I added one more to two of my sections.
You will see why I did two different sections in a minute.
Adding Mesh
In the picture, I show you how I make my mesh bows. I lay the mesh on the table and walk my fingers up to the middle of the wreath.
As I walk my fingers up I'm gathering the mesh between my fingers and thumb. I then pinch the mesh in the middle, this makes it look like a bow. This is also where I will be securing the mesh bow to the wire wreath frame

Making one mesh bow at a time I then secure it to the wireframe using the pipe cleaners I had already attached to the frame.
Twisting the pipe cleaner once around the mesh bow, the pipe cleaners are also how the ribbon will be added.
When I have all the ribbon added I'll go back and twist all the pipe cleaners a few times to make sure they are all secured.
Continue attaching the mesh bows to all the pipe cleaners. On this wreath, I went with every other color. This is why when I wanted a spot filled I had to add pipe cleaners to two of my sections.
Or else I would have ended up with the same color next to each other. Putting my pipe cleaners on different rows helps make the wreath fuller and covers the wireframe.
Ribbon Cutting
To make sure that all my ribbons were the same length I used the form that I made out of cardboard and covered it with clear tape.
I can't take credit for this brilliant idea, somewhere I had seen a lady use this idea and thought I would give it a try.

All I did to make my cardboard form was cut a piece of cardboard to my desired length. For this cardboard form, I cut the cardboard to 7 inches, so when I wrap my ribbon around it I'll have a 14-inch ribbon.
Wrapping the ribbon around the form three times, then cut the ribbon at the top of my form. This gave me three 14 inch ribbons for my wreath. Continuing to do this until I had 20 of each ribbon.
I colored the top of the cardboard so I knew where my top was, I also labeled the size of my form so I knew how long my ribbon would be.
To get the dovetail look to the ribbon, I folded the ribbon in half. Cutting at an angle on the fold of the ribbon to the wire part of the ribbon.
All the ribbon I used to make this wreath was wired edge ribbon, the wire helps hold the ribbon where I want it when placed on the wreath.
Ribbon Added
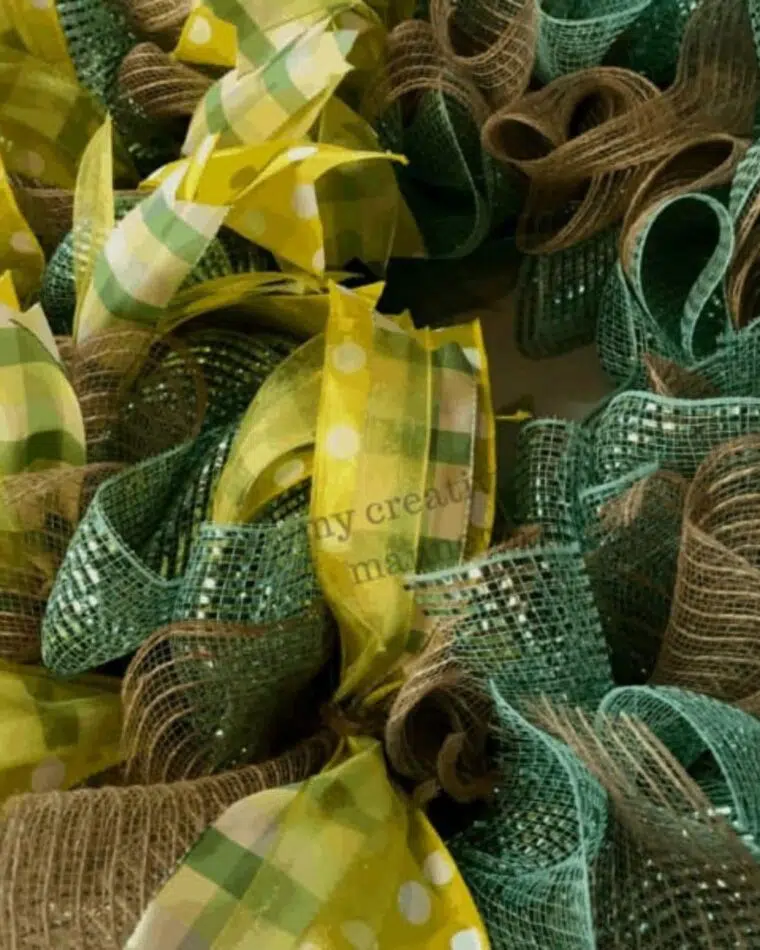
This beautiful plaid ribbon was my inspiration for making this wreath., I matched the mesh and the other ribbons to this plaid ribbon.
The white polka dot ribbon is starting to be one of my favorite ribbons, I have used it in another wreath that I made. I like the brightness this ribbon adds.
I placed the ribbons in order of how I would pick them up. Making my process a little easier to have them in order. Placing one of each ribbon on top of each other I pinched the middle of the ribbons.
With the ribbons pinched in the middle, I secured them on top of the mesh. Twisting the pipe cleaner a few times to make sure the ribbon and mesh were good and secured.
Working around the wreath, I placed the ribbons where I felt needed and where the wreath needed to be filled in.
Once all the ribbons were added I went back and twisted all the pipe cleaners a few more times. And tucking the ends as to not be seen from the front.
Also making sure that they don't poke out of the back, this could cause scratches on a door.
How To Add A Sign To A Mesh Wreath
Originally I was going to paint a welcome sign but things didn't work out with that sign. I found this cute Welcome sign at Hobby Lobby
Since the sign already had a wire on it I used that to help secure it to the wreath frame. Using pipe cleaners again, this time I pulled the pipe cleaner in from the front to the back.
I made sure to twist the pipe cleaner onto the frame well. Then tuck the ends of the pipe cleaner.

This is what the back of the wreath looks like. Most of the pipe cleaners are coming in from the back to the front.
With the exception of the four for the sign. Doing this makes sure that the pipe cleaners will not scrap a door.
When I'm done with making the wreaths I will go back with my scissors and cut any of the frays that may be sticking out. I also go around the whole wreath fluffing the mesh and ribbons to how I want it.
Since the ribbon is wire-edged I can give them a little curl.
Such a beautiful wreath that will welcome guests. ~Jenny
Don't forget to sign up to receive our emails.
Other posts from My Creative Manner you may like are:
DeeDee Lewis
Great instructions! Beautiful wreath!
Jennifer
Thank you very much, I'm glad that you like the wreath and found the instructions useful.
Pattie Cockerham
I was strolling through different wreath making and your was do far the easiest , I slow show the exact description of the mesh everyone doesn't show the mesh up close. Thank you when finished will post
Jennifer
I'm so happy that you found it easy. Can't wait to see how yours turns out.
Deb Gallagher
How much decorative ribbon did you use? I don't seem to see that listed. TY!
Jennifer
I cut 14 inches of ribbon in three different ribbon patterns to make 20 ribbon "bows" on the wreath. I believe that's about 840 inches of ribbon for this wreath in total. I hope that helps.
Mini
What was the length of each mesh ribbon? Thx!
Jennifer
I use about 6 inch ribbons but you can use whatever size you want.